

Quickstart
Build a workflow that takes a support ticket, classifies it with AI, and returns the category and priority. Then run it on your organization’s vault and read the run step by step.
A workflow is an agent: it lives in your Agent Service, is deployed like any agent, and runs on vault data once it is connected to the vault. You can build it in the ROC Workflow Builder or in TypeScript; pick a tab. Both produce the same kind of workflow.
New ticket (trigger) → Classify (AI) → Result { category, priority }Before you begin
- A ROC account with an Agent Service you can publish to, and an organization vault your account can write to. See Your Agent Service.
- For the Code tab, also Node.js 18 or later, pnpm, and the CLI credentials described in Install the CLI: your Agent Service’s bucket id and public key, a DDC access token in
CEF_DDC_ACCESS_TOKEN, and a CLI access token from ROC inCEF_ACCESS_TOKEN.
In the Builder, the classifier is an agent you create in place.
1. Create the workflow
- In ROC, open your Agent Service and choose Workflows in the side navigation.
- Choose New workflow.
- Name:
ticket-triage. What it does:Classify a support ticket. - Under Start from, choose Blank (“A trigger and one step”).
- Choose Create workflow.
The canvas opens on the Editor tab with an Event trigger wired to one Agent step.
2. Describe what starts a run
Select the trigger. Leave Event type as workflow.start, and set Example payload:
{ "ticketId": "T-1", "text": "I was charged twice for my October invoice." }The Run dialog is prefilled from this example.
3. Create the classifier agent
-
Select the Agent step and choose Choose an agent…, then New agent.
-
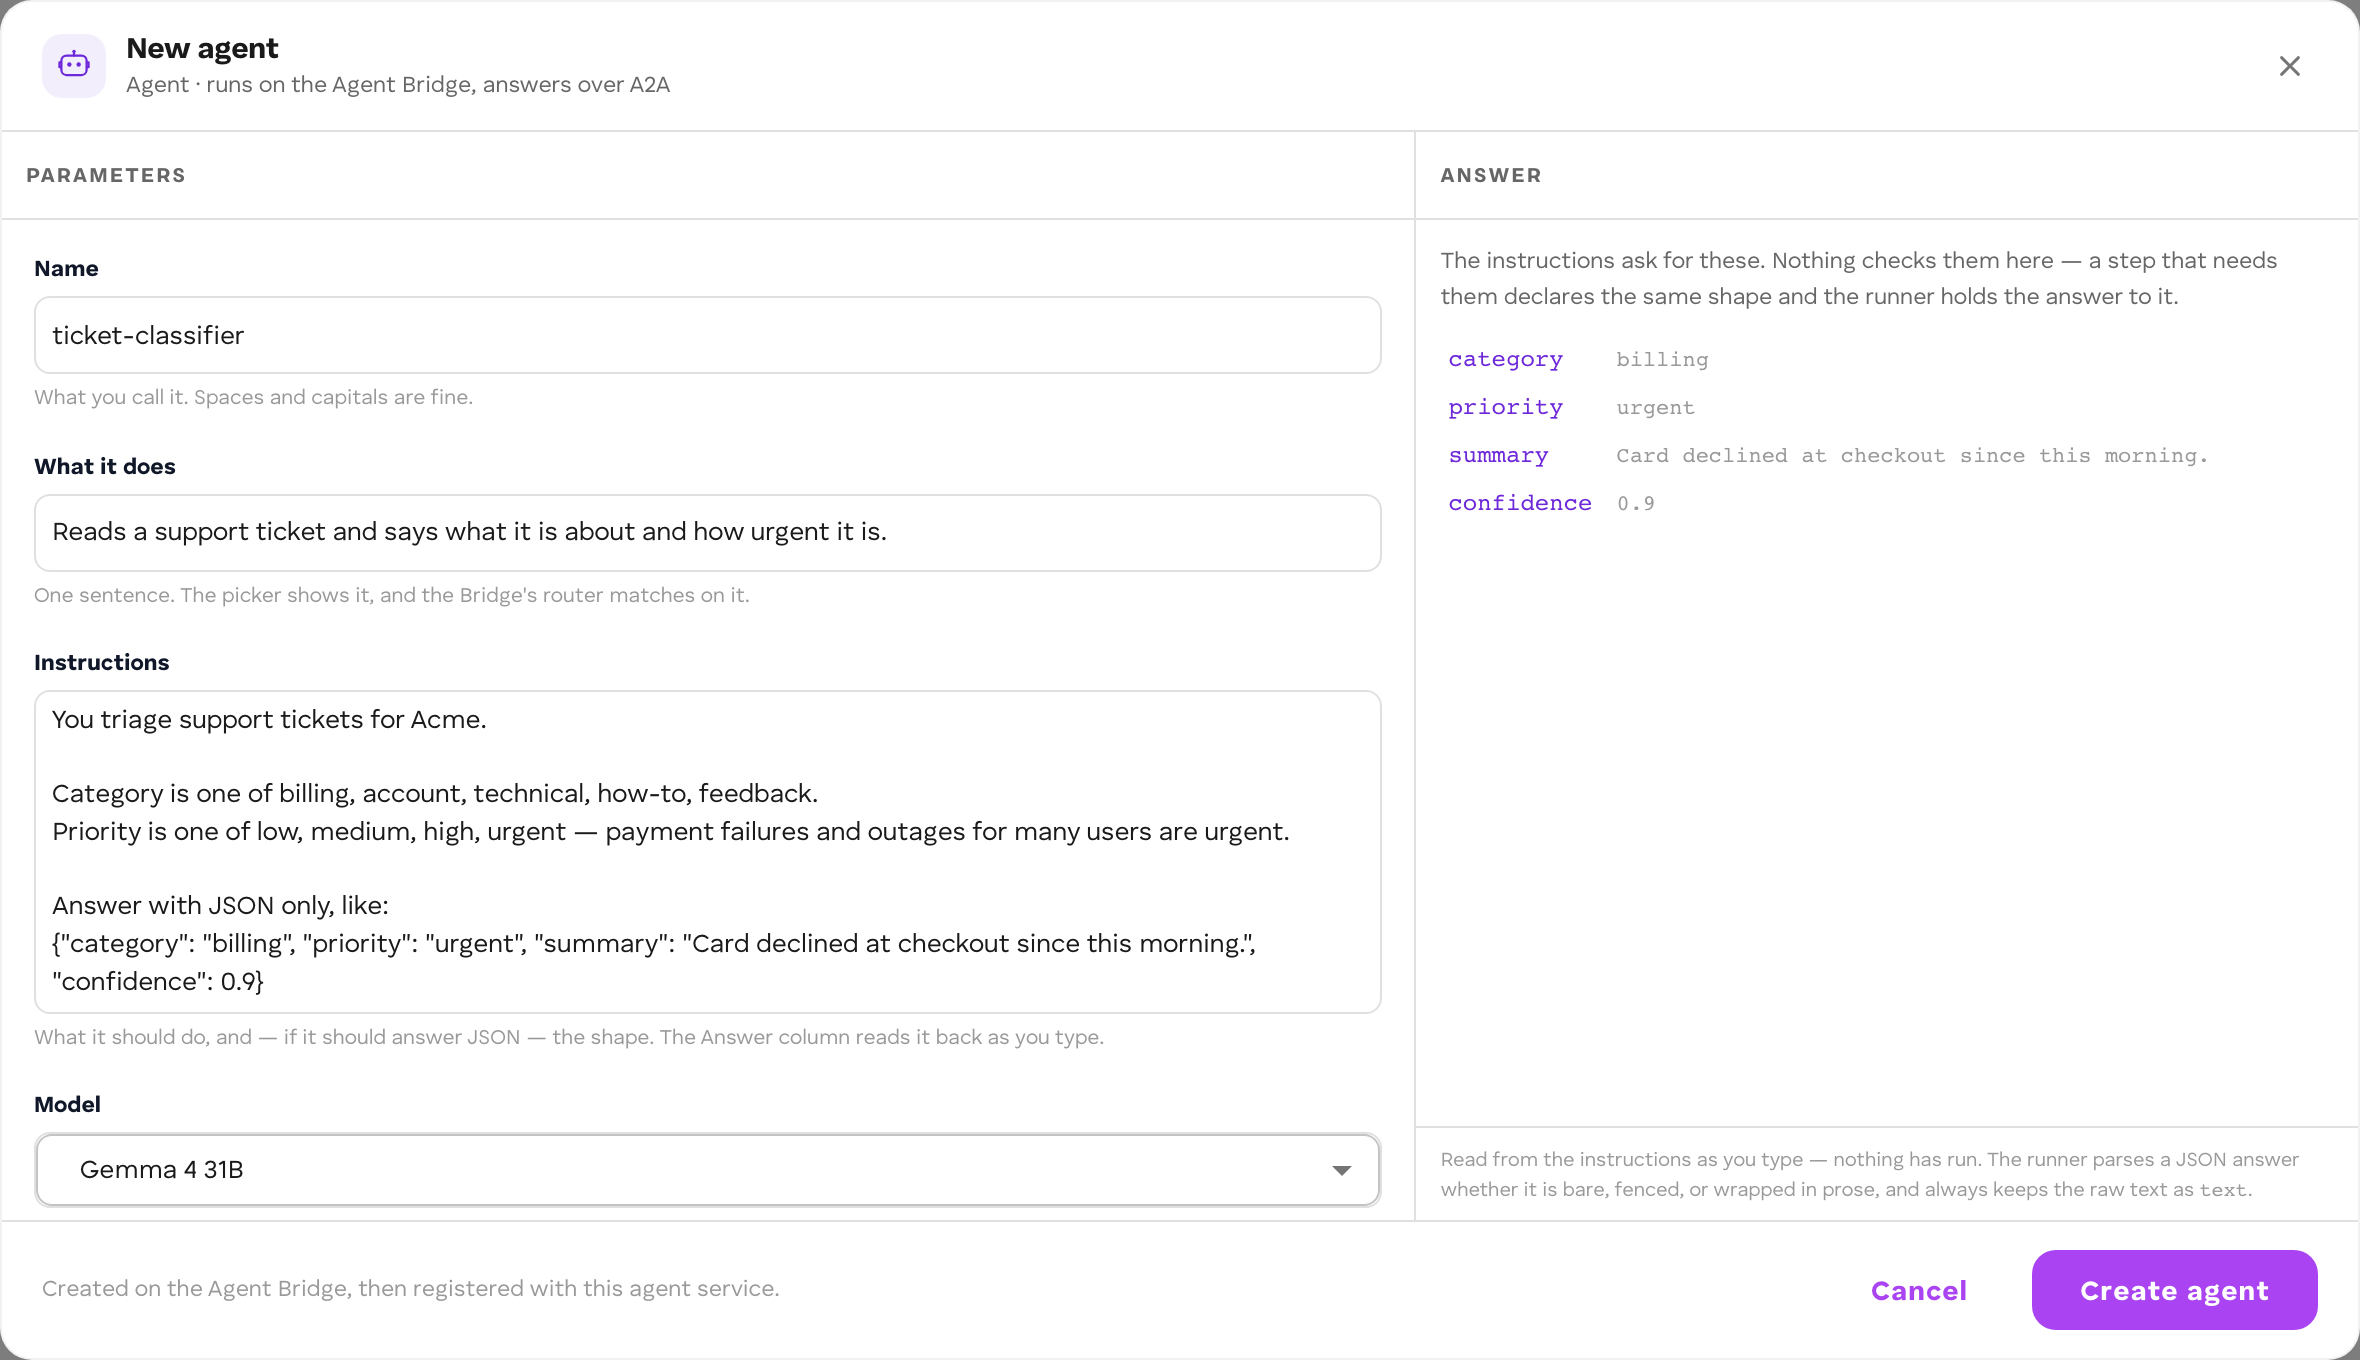
Fill the form:
- Name:
Ticket classifier - What it does:
Classifies a support ticket by category and priority. - Instructions:
You triage support tickets.Answer as JSON and nothing else:{"category": "billing" | "bug" | "question", "priority": "low" | "normal" | "urgent"}
- Model: keep the default, or pick a language model.
- Name:
-
Choose Create agent. The step now uses it.
-
On the step, set What to ask it to
={{ $json.text }}, and Answer it should give to:{ "category": "billing", "priority": "normal" }A run fails at this step, naming the missing field, if the agent answers without either key.
4. Return a result
- Choose Add a node on the canvas side rail, open Outputs, and add Result.
- Wire the Agent step’s output to the Result step.
- In Where each field comes from, add
categoryfrom={{ $json.category }}andpriorityfrom={{ $json.priority }}.
5. Deploy
Choose Deploy 0.1.0 in the toolbar. Deploy publishes the workflow as an agent of your Agent Service, makes this version live, and connects the workflow and its agent to your organization’s vault. If ROC asks you to approve the connection, approve it.
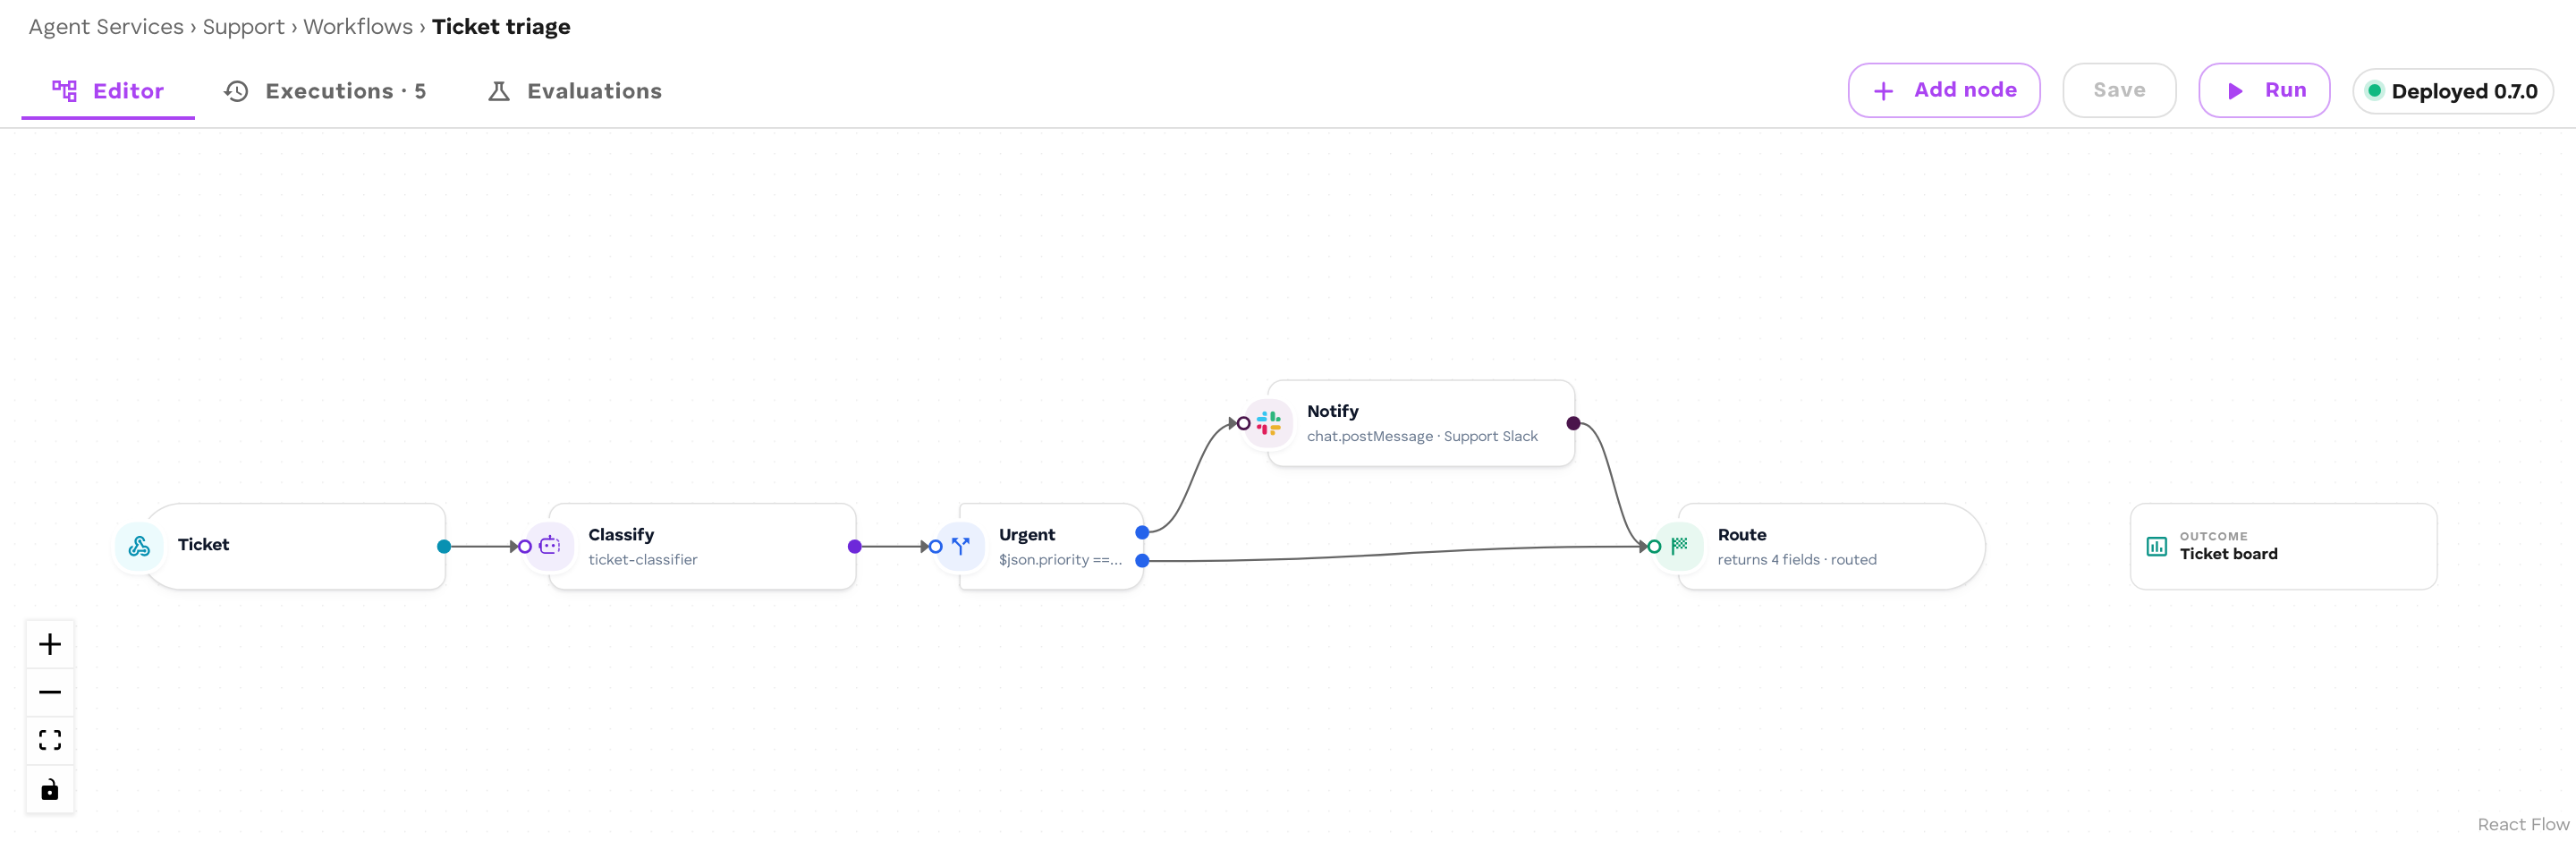
When it is done, the button reads Deployed 0.1.0. A finished workflow on the canvas looks like this one, which also branches on priority and pages Slack:
6. Run it
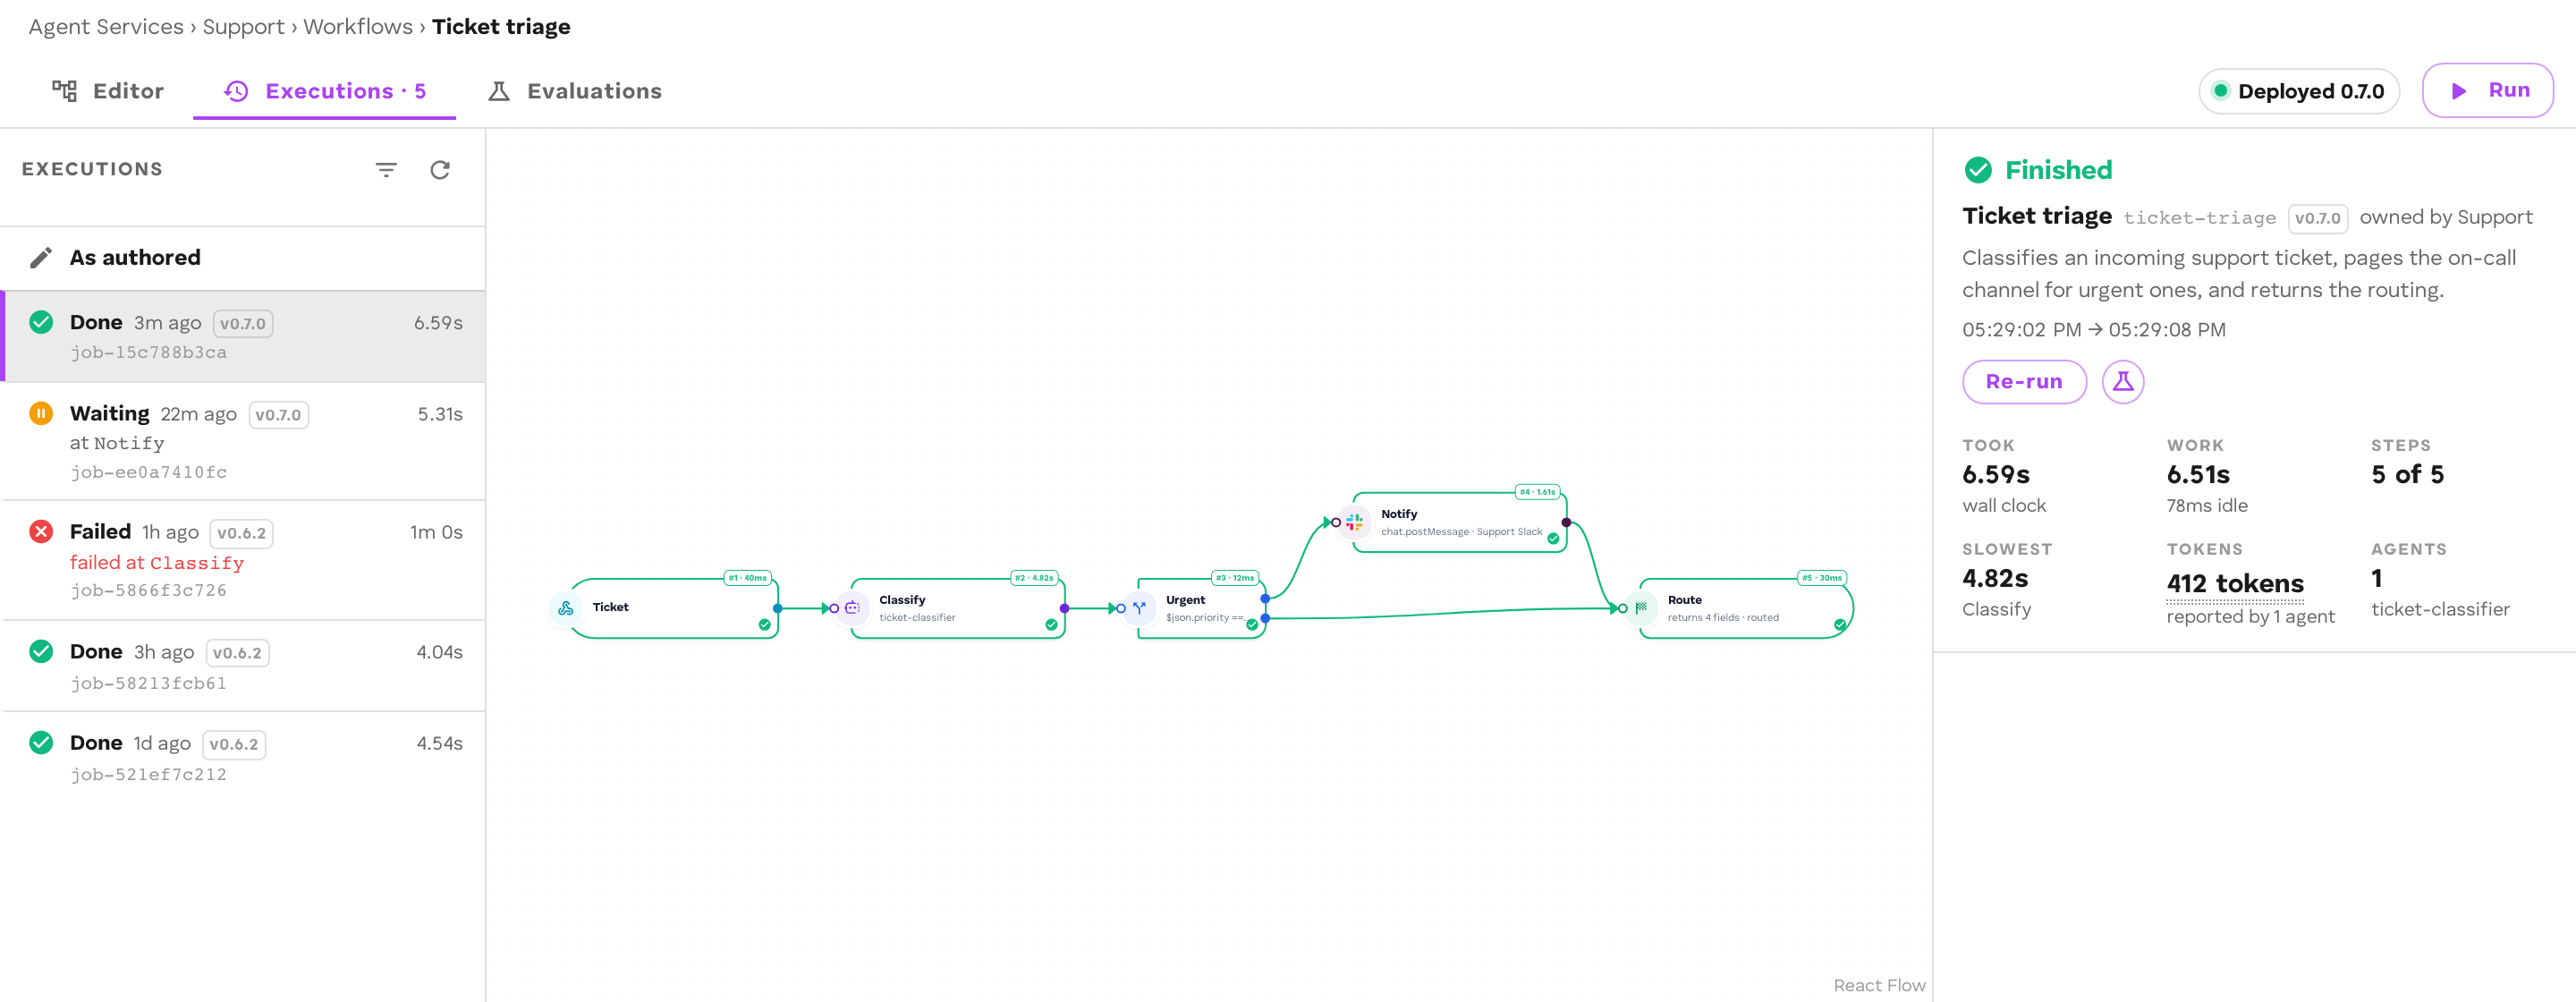
- Open the Executions tab. The chip beside Run shows where runs go: Runs in {organization} · {scope}.
- Choose Run. What starts it holds your example payload; edit the text if you like.
- Choose Run in the dialog.
The run appears in the list and on the canvas. Each step turns Success as it finishes.
7. Read the run
Open the run and select each step:
- the trigger Produced your payload;
- the Agent step Received the ticket and Produced
categoryandprioritymerged into the item; - the Result step shows the run’s output, with
categoryandpriority.
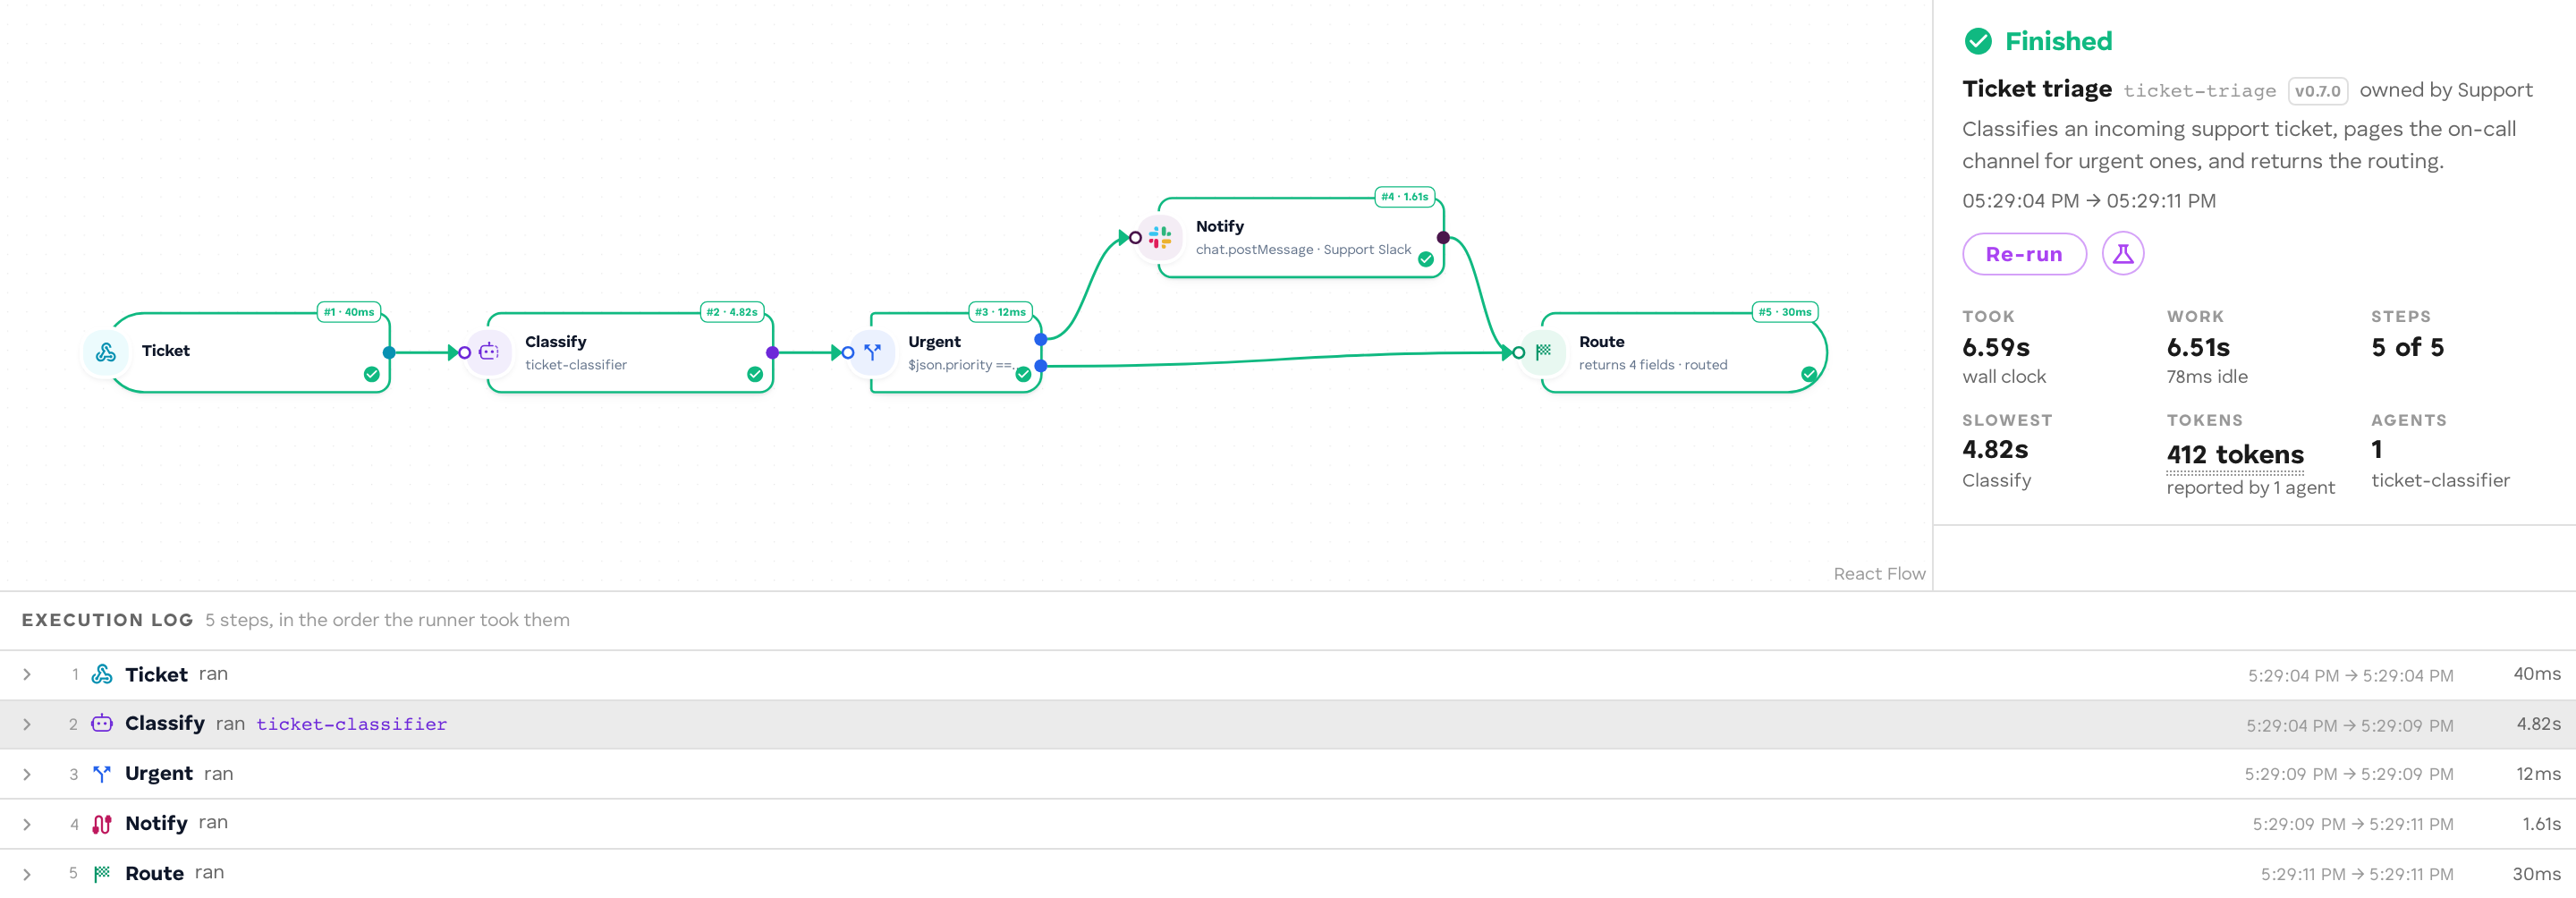
The run summary shows how long it took, the tokens used, and the cost. If a step failed, its error names the reason; see Monitor runs.
In code, the workflow calls a language model directly with a model step.
1. Scaffold a project
pnpm dlx @cef-ai/cli@^2.8.0 init ticket-triage --yescd ticket-triagepnpm add @cef-ai/agent-sdk@^5.8.0pnpm add -D @cef-ai/cli@^2.8.0 @cef-ai/testing@^3.3.5cef init creates a project with a sample agent, a deployments/default.jsonc that makes the newest version live, and a package.json. You replace the agent with a workflow next.
2. Pick a model
Open Models in ROC’s side navigation and choose a language model that is available. Note its alias (shown as ctx.models.<alias>), and the bucket, name, and version it is stored under. Its model.json URL has the path /<bucket>/models/<name>/<version>/model.json.
3. Declare the workflow
Replace cef.config.ts:
import { defineWorkflow } from "@cef-ai/agent-sdk/config";
export default defineWorkflow({  id: "ticket-triage",  version: "0.1.0",  goal: "Classify a support ticket",  models: {    // Key = the model's alias. Replace the URL with your model's.    llm: "https://cdn.example.com/1234/models/my-llm/1.0.0/model.json",  },  nodes: [    {      id: "ticket",      kind: "trigger",      label: "New ticket",      position: { x: 0, y: 0 },      params: {        sample: JSON.stringify({ ticketId: "T-1", text: "I was charged twice for my October invoice." }),      },    },    {      id: "classify",      kind: "model",      label: "Classify",      position: { x: 320, y: 0 },      params: {        alias: "llm",        input: {          messages: [            {              role: "user",              content:                "=Classify this support ticket. Answer as JSON: " +                '{"category": "billing" | "bug" | "question", "priority": "low" | "normal" | "urgent"}\n\n' +                "{{ $json.text }}",            },          ],          max_tokens: 64,          response_format: { type: "json_object" },        },        into: "classification",      },    },    {      id: "parse",      kind: "transform",      label: "Read the answer",      position: { x: 640, y: 0 },      params: { expr: "({ ...item, ...JSON.parse(item.classification.text) })" },    },    {      id: "result",      kind: "output",      label: "Result",      position: { x: 960, y: 0 },      params: {        result: { category: "={{ $json.category }}", priority: "={{ $json.priority }}" },      },    },  ],  edges: [    { from: "ticket", to: "classify" },    { from: "classify", to: "parse" },    { from: "parse", to: "result" },  ],});
What each part does:
- The trigger starts a run on
workflow.start;sampleprefills ROC’s Run dialog. - The model step sends the request to the model declared as
llmand puts the answer,{ text, usage }, underclassification. Strings starting with=are mappings:{{ $json.text }}reads the ticket text from the carried item. - The transform parses the model’s JSON text into fields.
- The output step declares the run’s result.
Delete the scaffold’s src/agent.ts and test/agent.test.ts; the workflow does not use them.
4. Build
pnpm cef build[ok] ticket-triage -> …/dist/ticket-triage/bundle.js (… bytes)[ok] ticket-triage -> …/dist/ticket-triage/manifest.jsoncef build runs the same checks the runner runs before a run. A typo in an edge, an undeclared model alias, or a template without its leading = fails here, not in production.
5. Push and deploy
pnpm cef push --bucket <bucketId> --as-pubkey <agentServicePubkey>pnpm cef deploy✓ Pushed <agentServicePubkey>:ticket-triage bundle to DDC✓ Deployed <agentServicePubkey>:ticket-triage — 1 deployment(s) [default] (revision 1)cef push uploads the workflow to your Agent Service’s bucket. cef deploy applies deployments/ and makes the version live. See Push and deploy.
6. Connect and run in ROC
- In ROC, open your Agent Service → Workflows.
ticket-triageis listed; open it. It is marked from the repo · read-only, because you edit it in code. - Open the Executions tab and choose Run.
- ROC connects the workflow to your organization’s vault before the first run. Approve the connection when asked.
- In Run this workflow, What starts it holds the sample payload. Choose Run.
7. Read the run
Open the run and select each step: the model step Produced classification.text, the transform added category and priority, and the Result step shows the run’s output. If a step failed, its error names the reason; see Monitor runs.
What you built
A deployed workflow, connected to your organization’s vault, that classifies a ticket and returns a typed result. Every run is recorded as a Job you can open step by step, re-run, or add to a dataset.
Next steps
- Branch on the result, ask a person to approve urgent tickets, and record results in a cubby: Steps, People in workflows, Cubbies.
- Start runs from a schedule, a webhook, or a Slack message: Triggers.
- Test the workflow in CI: Test a workflow.
- Score it against a dataset: Evaluations.